Forms can be included within HTML documents to gather information from users. Such forms have wide use for conducting commerce on the Web. You can, for instance, provide order forms to purchase products, create application forms for credit cards, conduct marketing research through survey forms, solicit customer satisfaction with feedback forms, and gather other information in the course of providing products and services on the Web. In education, forms can be used to register for on-line courses and to administer exams one-on-one to students. Other organizations and interest groups can use forms for membership applications and surveys. In general, forms are the primary means to gather information from users of your web. HTML forms have a couple of advantages over paper forms: you do not have to worry about deciphering poor handwriting since information is typed or chosen from lists; plus, the user can press a button and send the form immediately and directly to you. They have an advantage over e-mail or fax transmission in that you can be assured of structured, processible responses to your inquiries. Forms provide a variety of methods for data collection--text boxes, radio button, check boxes, menu selections, and other form fields--by which the user can type or select response information. Figure 15-1 illustrates a simple form using various fields. (Incidentally, if you click on the "Submit" button you will get an error message since the form is not fully implemented. But no harm is done.) Figure 15-1. An HTML form illustrating various input field types.
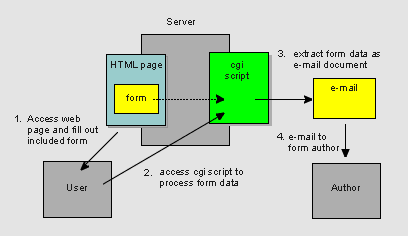
From the standpoint of the HTML code, forms are quite easy to construct. The processing of forms, however, is a different matter. Forms Processing Using Embedded ScriptsOne method of gathering and processing form data involves using code embedded within the HTML document. In this case, the data are massaged by processing routines coded internally as part of the page description, with the output displayed immediately within the document. For example, a table look-up application might involve the user submitting, say, the name of a city, and the document looking up and returning the appropriate zip code or telephone area code. Or, a student might be presented with some self-test questions which are scored and the results displayed in the document. In these and similar cases, processing takes place through code added to the page description language and the results are immediately fed back to the user. One of the drawbacks of this approach, though, is that the information gathered and processed by the document are not retained when the user exits the page. The information is lost forever. For some applications this might be satisfactory; for others, you may need a way to save the information gathered and process it further.A more significant drawback of this approach, however, is the fact that the HTML language simply does not contain any such processing facilities. There are no file processing, arithmetic, or logical control commands similar to those found in most programming languages. Therefore, in order to perform even simple on-page processing, you must become familiar with a "scripting" language such as JavaScript or VBScript (Visual Basic Script). These are similar to programming languages, and the processing routines (scripts) written in these languages can be embedded within the HTML document and carry out processing of form data. Even so, the data gathered from the form and the information produced by these routines are not retained once the user leaves the page. Forms Processing Using External ScriptsUsually, information is gathered by a form in order to keep it--to put it in a file or a database, to process it and save the results, or to transmit the information to the author of the form for further processing and storage. Again, however, HTML does not provide these services. It can gather the information through use of form fields, but the storage or transmittal of the information must be handled by different programs, in this case separate from, not embedded within, the HTML document.As a group, such programs are called CGI (Common Gateway Interface) programs. They are used to take information from a form and process it outside the web page and outside the constraints of the HTML language. CGI scripts, for example, can be used to place form information in an file or database, to retrieve and process the stored information, to return processing results to users, to send the information to the form's author, or to perform virtually any other kind of processing common to full-featured programming languages. CGI scripts are, in fact, written in programming languages such as C or C++, Java, Visual Basic, and other languages. One of the popular CGI programming languages on the Internet and a common one used to process data collected from forms is called Perl, an acronym for Practical Extraction and Report Language. CGI scripts written in Perl (or one of the other languages) normally reside in a special directory on the network server machine that contains your web. Through commands embedded in your document, these scripts are called up and executed to perform some type of processing external to your document, much like using program subroutines. Following this processing, control returns to your web document. You can, therefore, use a CGI program to capture form information and to do something with it beyond the scope of your HTML document and beyond the constraints of the HTML language. The program is the bridge between the web document and the external world of servers, files, databases, networks, and nodes. The reason for mentioning the Perl language is not to introduce coverage of its structure or syntax, but to note that many Perl programs are already available to handle common processing tasks. You may not even need to learn the lanaguage or write a program to get your processing done. Many WWW sites already have the program you need. Your task is to get a copy of the program and then install it on your server so that you can use it from your documents. Getting programs installed on your Internet Service Provider's (ISP) server machine may introduce further difficulties. Sometimes, user-supplied programs are not permitted on the server; other times, you must have special permission and assistance of the system administrator to install them in special system directories, or you may need to access prewritten programs already hidden somewhere on the server. If you're fortunate, you can establish your own "executables" directory (often named the "cgi-bin" directory) in you own web directory and handle your processing by yourself. Even so, some service providers may not provide personal help in installing CGI programs, leaving the matter to your own initiative and persistence. The point of all this is that a lot of preparation precedes creation of HTML forms. First, you need to find or write the program to capture the information from your form. Second, you may need to modify an existing program to fit your needs or your service provider's requirements. Third, you need to install the program on your server, possibly with the permission and help (or discouragement) from the system administrator. Fourth, you need to write the HTML code to include the form and its processing calls in your document. Fifth, assuming success in the above and in capturing the data and tranmitting it to your server, you need to decide what to do with the information once you have it--which sort of starts the whole process over again. Mail-To FormsOne of the least cumbersome ways of collecting form information is to have it send to you through your e-mail account. Several varieties of CGI programs exist which provide this service. These are general-purpose programs that work with any form design. They simply scan your form, pulling out the information entered by the user, and then automatically send that data to you. Typically, the resulting e-mail document contains a list of form field names and their associated data.Figure 15-2. Using a CGI program to e-mail form data to the web author.

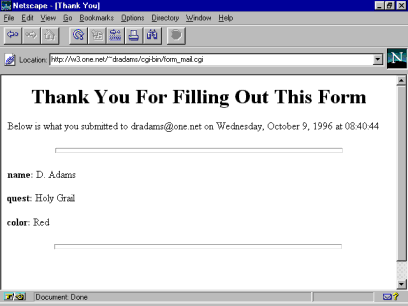
A great advantage of this approach is that the e-mail document can be saved as a text file and used as input to your local desktop computer. You can, for instance, import the data into spreadsheets or databases and use local processing on the fields. You may not need to find or write other CGI programs to manipulate the data. One good source for CGI scripts, including a mail-to script named FormMail, is Matt's Script Archive. When the user fills out and submits a form, the FormMail script produces a confirmation page showing the values captured for each form field. Figure 15-3 shows an example of this confirmation for the small form at the top of this page. Figure 15-3. Confirmation page of FormMail CGI script.

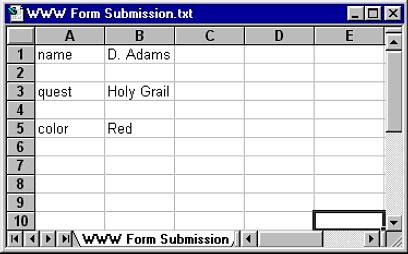
This information in this structure is then sent automatically by e-mail to the form author. Once received, the e-mail message can be saved as a text file for input into a local program. Figure 15-4, for example, shows the data having been imported into a spreadsheet program, ready for further processing. Figure 15-4. FormMail information imported into a spreadsheet.

This digression into CGI programs and the like is a reminder that creating HTML forms is only a part of the use of forms in your documents. A related concern is what to do with the form information once the user has responded. With those thoughts as the backdrop, then, let's move on to look at how you create forms on your HTML page. The <FORM> TagA form is identified by the <FORM> tag and its accompanying end tag. The form can comprise an entire page, or several different forms can appear throughout a page. The general format of this tag is
<FORM parameters> where the parameters can include: Appearing between the <FORM> and </FORM> tags are the tags to define the controls--the data entry fields into which the user types information or from which the user selects from preformatted responses. Several different types of controls are available. The <INPUT> Tag<INPUT> tags are used to define controls for single-line text entry fields, radio buttons, and check boxes. The general format of the <INPUT> tag is<INPUT parameters> where one of the parameters is the TYPE parameter, which specifies what kind of control to use. TYPE can be one of the values: TEXT, RADIO, or CHECKBOX.
The <TEXTAREA> TagIf you need a text field that spans multiple lines, you can use the <TEXTAREA> tag instead of the <INPUT TYPE=TEXT> tag. It provides you with a scrollable field wherein you set the number of columns and number of rows of the viewable area. For example, the specifications:
<FORM> produce the following control:
The text appearing between the start and end tags ("Type your response in this field.") is optional but can be used to initialize the field as a prompt. It should be remembered that the text area definition only gives the visible, not the logical, size of the field. When the user types, the entered text can go beyond these visible boundaries, as it does in the above example. Effectively, any number of characters can be entered across a line, with the text window scrolling to the right to follow the typing. At the same time, carriage returns force multiple lines that may range beyond the visible bottom of the field. If you wish for a little more control over the appearance of text in the field, you can enforce word wrapping. Use the WRAP=YES parameter for a better effect:
<FORM>
The <SELECT> and <OPTION> TagsMenus are alternatives to radio buttons or check boxes and are especially useful when there is a large number of responses that would be awkward to format or take up too much space with buttons or boxes:
The above menu is described by the following code:
<FORM> The <SELECT> tag identifies this as a menu control and assigned a NAME to it; the enclosed <OPTION> tags specify the menu items, giving the VALUE assigned to the control when a particular item is selected and the name of the item that appears in the menu. You can include the word SELECTED in the <OPTION> tag for the item you wish to appear preselected; otherwise, it is the first item in the menu. In the above example, the user is expected to choose only one of the menu items. You can, however, permit multiple selections, using a menu just as you would checkboxes. In this case, the entire menu is exposed and the user can make several choices by clicking on the items with the "Ctrl" or "Shift" key depressed:
The only change needed in the above code is the addition of the specification MULTIPLE in the <SELECT> tag: <SELECT NAME="music" MULTIPLE> Again, CGI scripts processing this form would return all selected values for the control. Submitting and Resetting FormsNothing happens to the data entered or selected by the user until the form is "submitted"; that is, it is directed to the processing routine identified in the ACTION parameter of the <FORM> tag. In order to submit the form for processing, you need to use an <INPUT> tag with a SUBMIT type parameter. This tag produces a submit button that, when clicked by the user, initiates the processing:
<INPUT TYPE=SUBMIT>
The VALUE="label name" parameter in the <INPUT> tag can be used to change the default button label "Submit Query". You also need to give users the option of changing their minds. The TYPE=RESET specification produces a similar button that resets all form fields to their default values:
<INPUT TYPE=RESET>
The VALUE="label name" attribute can also be used to assign a label name to this button. If you wish to get cute about a submit button, you can use a graphic image. By using TYPE=IMAGE along with a SRC= parameter in the <INPUT> tag, you can display a picture that works like a submit button. <INPUT TYPE=IMAGE SRC="imagefile.ext">
Two additional data fields are generated when the form is submitted. You are provided with the x and y coordinates of the location on the image where the user clicked. This is extra information that can be ignored. A Simple FormWe can summarize this discussion by taking a look at a the coding for a complete form. Below is repeated the example form that appears at the top of this page. Following that is the coding for the form.
<CENTER>
<FORM METHOD=POST>
</TD>
And such are the ways and means of forms.
| |
